

Writing efficient CSS code should not be daunting or frustrating if you understand the basic and essential concepts of CSS. This article describes these concepts in a way that makes sense even to beginners.
NOTE: This article is not a tutorial on learning how to write CSS code, it simply talks about some key concepts and ideas in CSS you need to understand to write better CSS code, understand and debug CSS with ease. The article assumes you know what CSS(Cascading Style Sheet) is, and may have written some CSS code before.
A Quick Overview
Below is a brief what this article covers:
- Syntax
- Adding CSS to a Webpage
- Selectors
- Cascading
- Specificity
- Inheritance
- !importance Keyword
- Source order
- Useful Resources
- Stylesheets Source
Syntax
Understanding syntax is essential to all languages with no exception to CSS. Fortunately, CSS syntax is pretty slim as easy to understand.
selector { property: value; }
Is this all there is to CSS? No, there is a lot more. But having in mind this syntax is where it all begins.
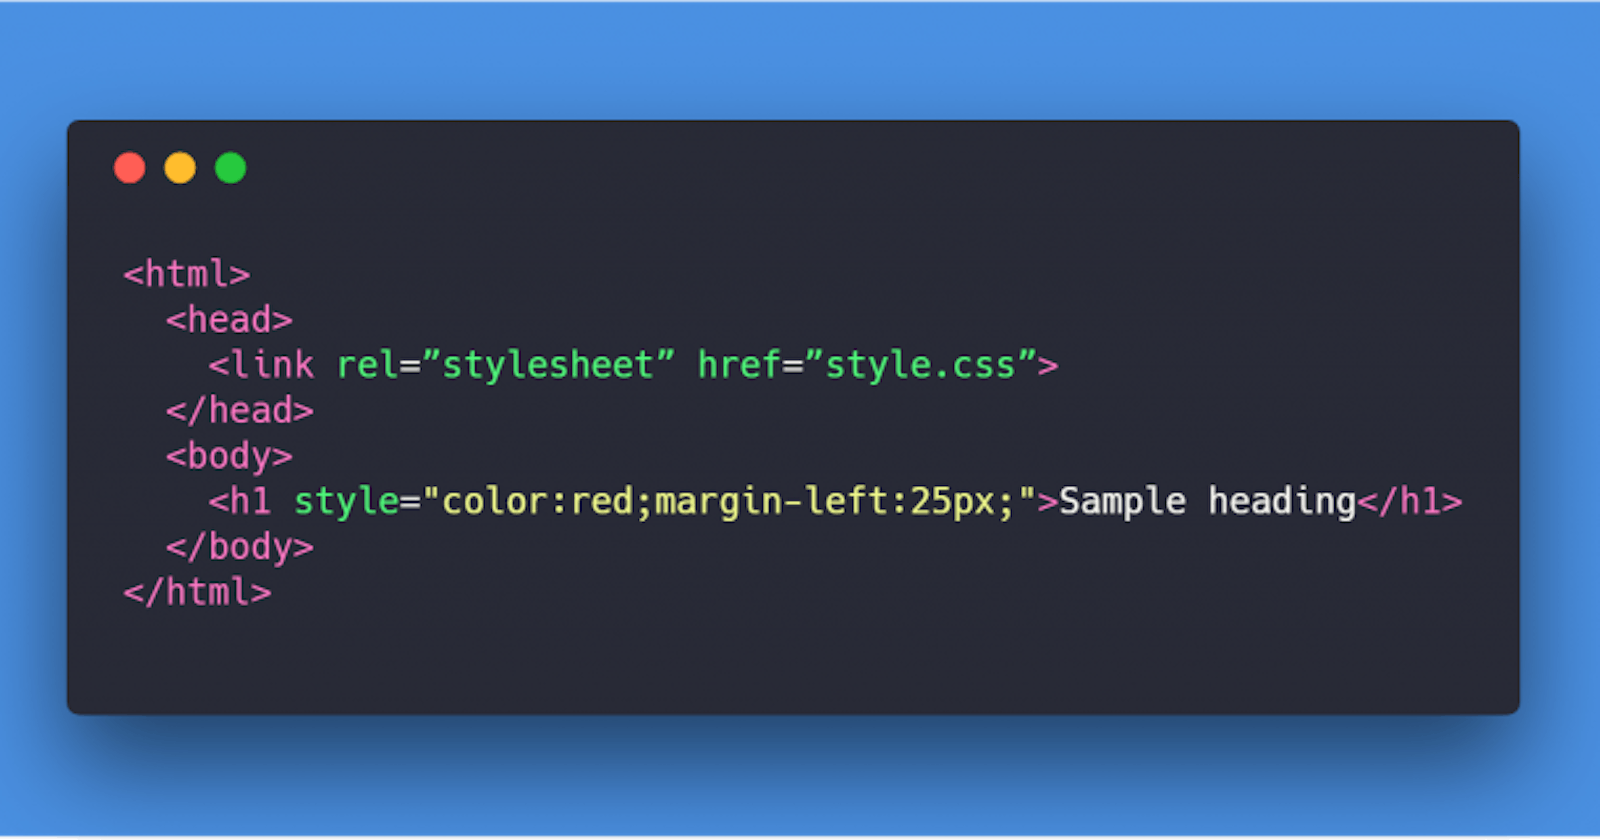
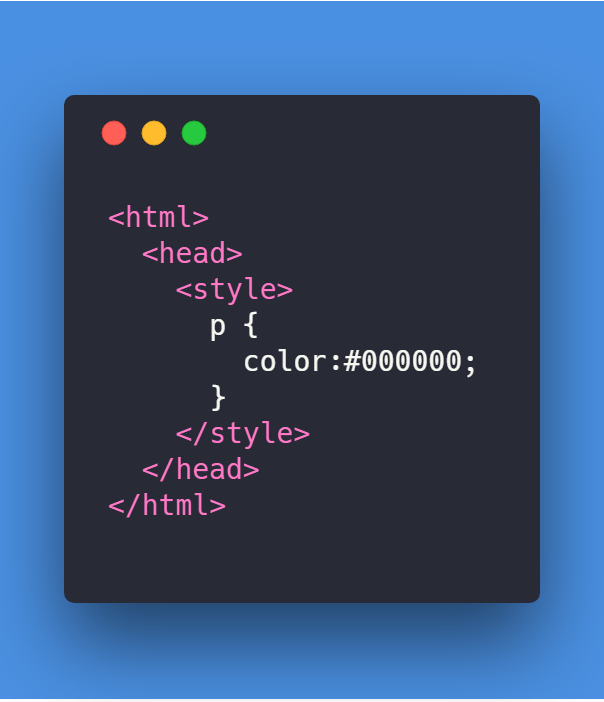
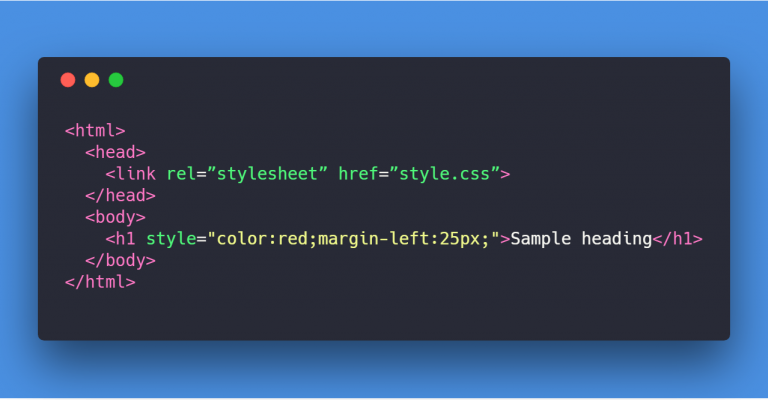
Adding CSS to a web page
There are 3 ways to use CSS on a webpage:
- Inline CSS:
Styles are applied directly on the HTML markup using a
styleattribute.
- External CSS:
CSS is written a separate file and added to a webpage using the
<link>tag

- Embedded CSS:
Styles are applied directly on the HTML markup using a
styletag usually placed in the<head>so it applies to all elements on the page
Selectors
CSS is used to style elements or components on a webpage. A Selector is a target element or component on a webpage that a set of CSS rules should be applied to (i.e. styled). Every CSS Rule requires a Selector which is either declared explicitly (as in Embedded and External styles) or implicitly (this is the case of inline-CSS where the selector is not written).
It is very important to understand the types of Selectors and how there are constructed. There are quite a number of these selector types; they won't be discussed here but there is a useful resource about this at the end of this article.
Here, we break down these selector types into different categories.
Universal Selector: This matches elements of any type.
      /* Selects all elements */
      * {
          color: green;
      }
Element Selectors: This type of selector targets all elements with the specified node name.
      /* Selects all <a> anchor elements */
      a {
          text-decoration: none;
      }
Class Selectors: A Class selector is preceded with a dot
.. There are used to target elements with the specified class.Syntax:
.className { property:value };/* Selects all <a> anchor elements */ .btn { cursor: pointer; }- id Selectors: An ID selectors is preceded with an
#symbol.
Syntax:
#id { property:value };```css /* Selects all #nav-icon elements on focus state */ #nav-icon { border: 1px solid #00f; } ```
Attribute Selectors: The attribute selector matches elements based on the presence or value of a given attribute.
      /* <a> elements with a title attribute */
      a[title] {
          color: purple;
      }
Pseudo Class Selectors: These set of selectors identified by a preceding
:and they used to style an element based on its state./* Selects all <input> elements on focus state */ input:focus { border: 1px solid #00f; }Pseudo Element Selectors: These set of selectors identified by a preceding
::(though some still use:as in older CSS specification). They are used style a specific part of the selected element(s)./* The first line of every <p> element. */ p::first-line { color: blue; text-transform: uppercase; }Combinators: These are not selectors on their own but they can be used to construct complex selectors.
Descendant Combinator
  /* List items that are descendants of the <ul> element with a class nav */
 ul.nav li {
     margin: 2em;
 }
comma
,: This is used to apply a set of rules to multiple selectors./* Selects all <h1>, <h2>, <h3> elements */ h1,h2,h3 { margin: 0; }child combinator
>: This is placed between two CSS selectors and applies only when the second selector is a direct child of the first./* Selects every <p> that are direct children of the <article> element with a class post */ article.post > p { background-color: yellow; }adjacent sibling combinator
+: This separates two selectors and selects the second element only if it immediately follows the first element, and both are children of the same parent element./* Paragraphs <p> elements that are siblings of and subsequent to any <img> element */ img + p { color: red; }general sibling combinator
~: This separates two selectors and matches the second element only if it follows the first element (though not necessarily immediately), and both are children of the same parent element./* Paragraphs <p> elements that come immediately after any <img> element */ img ~ p { color: red; }
Shorthand Properties
Shorthand property is a property that is used in place on two or more properties. It is essential to know that CSS has some shorthand properties for a set of properties and understand how to specify their values. This concept will help you write less CSS code.
Let's dive into code
See this sample
    /* Selects all <div> elements with class preview */
    div.preview {
        background-image: url(./background-image.png);
        background-position: center;
        background-size: cover;
        background-repeat: no-repeat;
        background-attachment: fixed;
        margin-top: 1rem;
        margin-bottom: 1rem;
        margin-right: 2rem;
        margin-left: 2rem;
    }
Same code with shorthand Properties
    /* Selects all <div> elements with class preview */
    div.preview {
        background: url(./background-image.png) center/cover no-repeat fixed;
        margin: 1rem 2rem;
    }
Cascading
CSS stands for Cascading Style Sheets, and that first word Cascading is incredibly very important to understand. The way that the cascade behaves is key to understanding CSS. Of all the essential concepts to understand in CSS, this one is the fuzziest to developers. Have you ever written a CSS property and the value doesn’t seem to work? Usually, the problem is that you have created two rules which could potentially apply to the same element.
Cascade is the algorithm that determines the properties applied to each element on the page.
Specificity
What happens when an element is targeted by multiple rules, with different selectors, that affect the same property?
Specificity is how the browser decides which rule applies if multiple rules have different selectors, but could still apply to the same element. It is basically a measure of how specific a selector's selection will be.
Here is a nice cheat chart for calculating CSS Specificity - by Estelle Weyl.
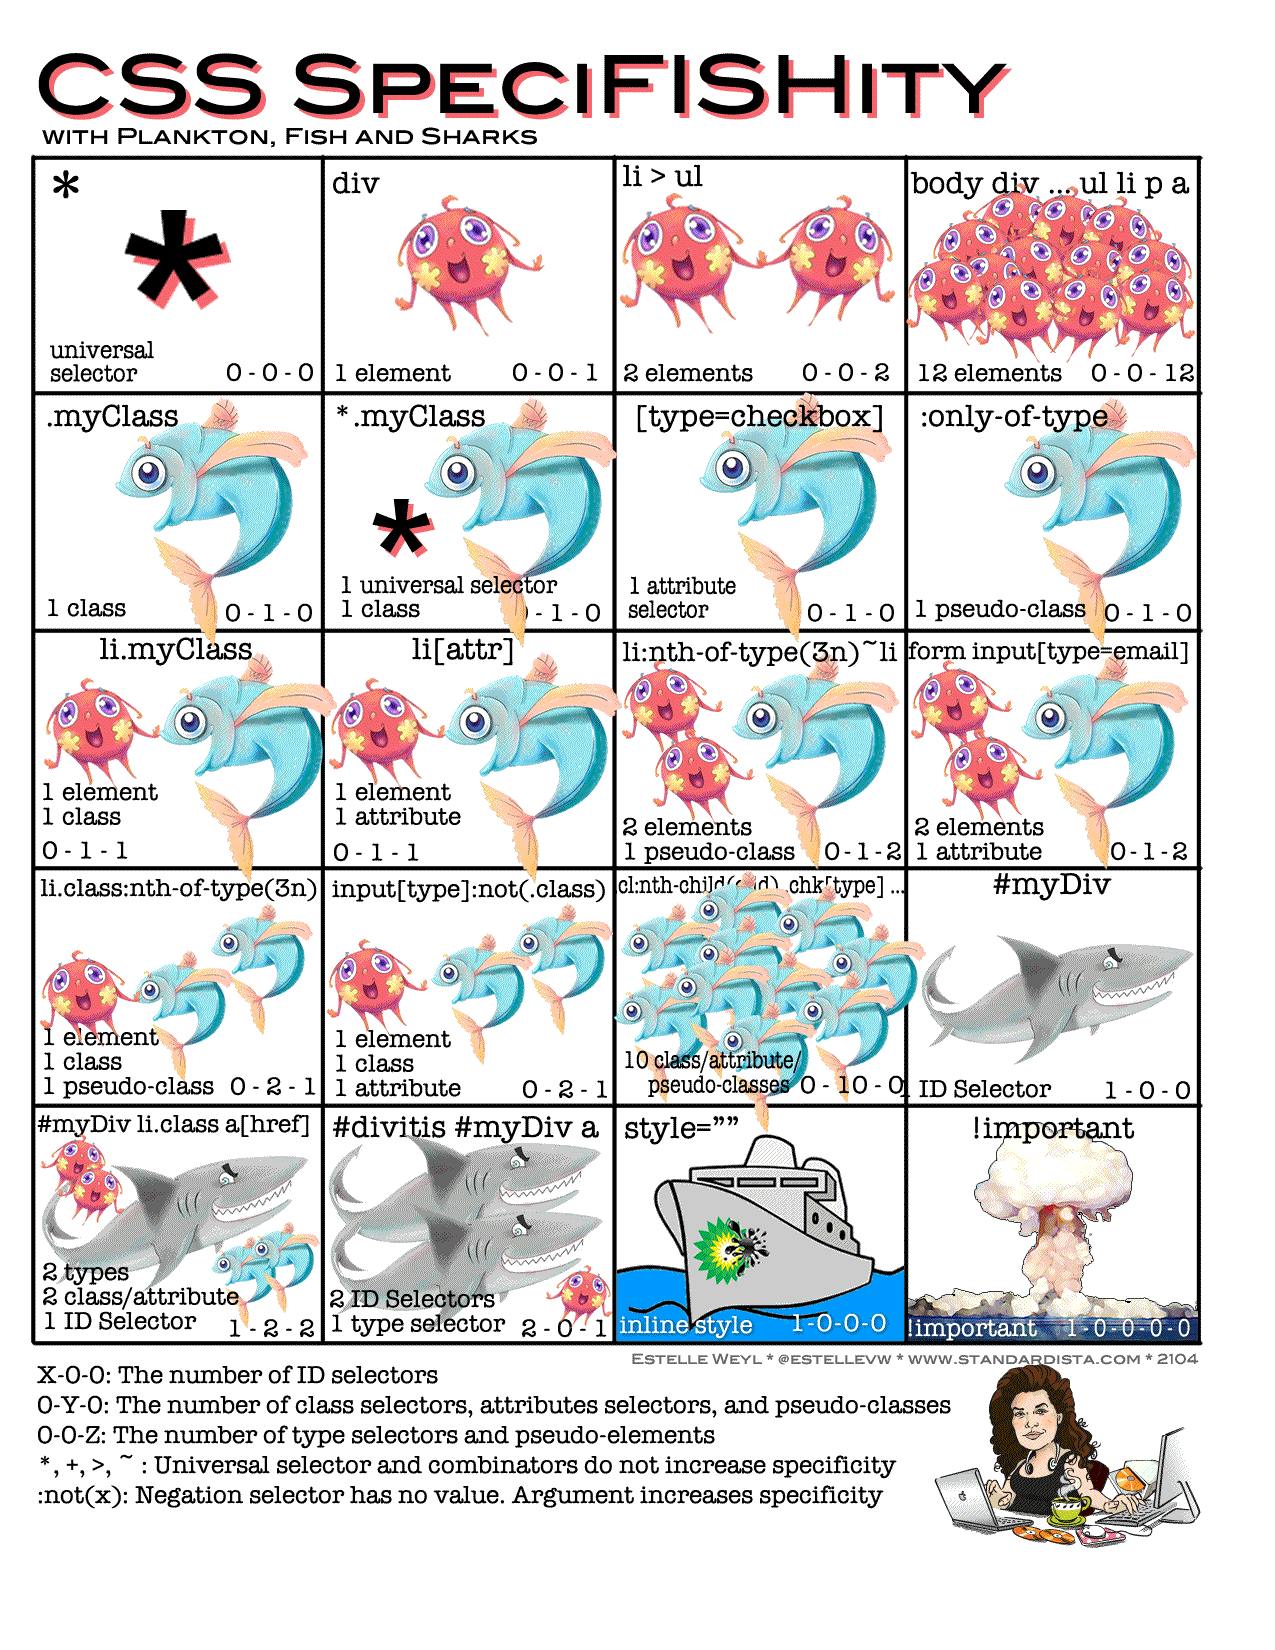
Tip: Use a selector with the least specificity to target specify element(s);
<p class="hello" id="say-hello">Say Hello!!</p>
More Preferable
    .class {
        font-style: italic;
    }
than this whose specificity is 101
    p#say-hello {
        font-style: italic;
    }
Inheritance
It is important to know that some (not all) CSS property values set on parent elements are inherited by their child elements.
For example, if you set a color and font-family on an element, every element inside it will also be styled with that color and font, unless you've applied different color and font values directly to them.
    body {
        font-family: "Trebuchet MS", "Lucida Grande", "Lucida Sans Unicode", "Lucida Sans", Tahoma, sans-serif;
        color: red;
        box-sizing: border-box;
    }
What if you have a property that’s not inherited by default, and you want it to, in a child? CSS provides these special universal property values for controlling inheritance. Every CSS property accepts these values.
inherit: this turns on inheritance - sets the property value applied to a selected element to be the same as that of its parent element.
a { text-decoration: inherit; }initial: Sets the property value applied to a selected element to use the browser's default stylesheet (commonly referred to as
user-agentstyles) if available; if not, checks if the property inherits by default, if it does, inherit the value; otherwise do nothing.unset: Resets the property to its natural value, which means that if the property is naturally inherited it acts like inherit, otherwise do nothing.
!important Keyword
This is used to make a particular property and value the most specific thing, thus overriding the normal rules of the cascade. Specificity does not matter if a rule ends with !important.
    p {
        background-color: blue !important;
        color: white;
        padding: 5px;
    }
    p.lead {
        background-color: gray;
    }
That background-color: blue !important; rule will take precedence over any rule with more specificity.
Tip: Avoid using !important flag in your code. It's really a bad practice
Source Order
How rules are written in the source file is important to cascading. Rules written at the bottom over those previously written at the top. If you have more than one rule with the same weight (same specificity), then the one that comes last in the CSS will win.
    p {
        background-color: blue;
        color: white;
        padding: 5px;
    }
    p {
        background-color: gray;
    }
background-color: gray will win in this case.
Stylesheet Source
It is important to know that there are 3 sources the browser uses to render CSS to a webpage
User-Agent Stylesheet: Have you ever wondered why button's or Chrome Browser may look different from that of Safari? The browser has a basic style sheet that gives a default style to any document. These style sheets are named user-agent stylesheets.
Author stylesheets: The author of the page defines the styles for the document using one or more stylesheets
User stylesheets: The user (or reader) of the web site can choose to override styles in many browsers using a custom user stylesheet designed to tailor the experience to the user's wishes.
Useful Resources
Here is a list of other resources: